This blog is an extension of my Youtube video showing how to make your own Goggles of Night from D&D. Let's Get Started!

The design for the Goggles of Night was drawn from the artist's interpretation of what it looks like in the 5th Edition Dungeons and Dragons books. I took their rendering and made it a physical item that works in real life.
Let's start making!
Tools Used: [None of the Links are Affiliate Links]
Goggles:
>Pair of Steampunk Goggles you are cool with taking apart
Foam Supplies:
>2mm and 5mm foam - Yayahan Foam from Joann's Fabrics >Worbla Finest Art - Purchased from Michaels [Do not forget your coupon!]
>Weldwood Contact Cement - Local Hardware Store Purchase >Heat Gun - Wagner Heat Gun
>Wood Glue [Purchased at Local Hardware Store] - I used Elmer's Carpenter Wood Glue
Sanding Supplies:
>Dremel Stylo+ - This is the one I have >Sanding Barrels: These get used all the time Places to Purchase : Local Hardware Store or Packages of a Bunch like this one
Paint Supplies:
Plaid FX - Chainmail (Silver), Golden Hour (Gold), Bronzed (Bronze) Highlight of White: Liquitex White -Turquoise Paint of Your Choice - Used Liquitex Turquoise
Safety Supplies: [Most important tools] >Dust Mask or Respirator >Nitrile Gloves >Safety Glasses >Ear Protection
THE STEPS
Step One: Gather Supplies
First step is gather everything you need. Most of the supplies are part of my stash or could be purchased locally. The one piece that might be hard to find locally would be those plastic steampunk goggles. So gather everything up and you are ready to go!
Step Two: Make Paper Mockup
Now that you have all the materials, Lets make a paper pattern based on the purchased goggles. You might purchase different ones which would change up your needs to cutting and assembling the foam pieces.

Tip 1: Use scrap paper to make paper pattern to save some printer paper for later.
Step Three: Cut out Foam Pieces
Now that you have a paper pattern you like - let's cut out those foam pieces. The cut list and thickness of foam I used are below.
Cut List:
5mm Foam - Cut 4 of Front Bronze Piece (2 for each side) 5mm Foam - Cut 4 of Center Silver Piece (2 for each side) 2mm Foam - Cut 2 of Back Gold Piece (1 for each side)

TIP 2: You can rough cut these pieces out before gluing together. It will give you a little wiggle room once you start to shape.
Step Four: Glue Layers Together and Sand Them to Shape
Using my contact cement, I added all the pairs together so I could work on sanding them. This is where I sanded the groves into the Back Gold piece. I did end up added worbla details to it later to have those stand out a little bit more.

Step Five: Grab Leather Pieces and Make Paper Templates
For Leather - I used a thin weight leather and medium weight leather that I had in my scrap pile. I seem to always have some left over from samples and book covers I am creating. I stained them a lovely brown using the Waterstain Brown from Black Raven Armory.
Then I created a paper pattern for the pieces. Those were based off of the shape of the goggles. The nose guard was thin leather 2-4 oz. The side pieces and strapping (3/4" tall) was all made out of 6-8oz leather.

TIP 3: Make sure to double check you are mirroring your pieces before marking up the final leather.
Step Six: Cut out Leather Pieces and Bevel Edges
Now is the time to do the thing and cut the leather with a mat knife.

I also beveled all edges, re-stain them, and burnished them. That process allows for the edges to lay smooth against someone's face. It takes more time but it is the big difference between nice edges and mediocre final product.
Step Seven: Paint the Lens
Before attaching any of the leather, I used acrylic paint (watered down) and theatrical gels to cover the lens. There are a ton of different ways to do this (for example: you can purchase tinted lens in the correct size to fit this area or resin cast thin lens that are tinted). You pick the best way for you and how you would like to accomplish it.

Step Eight: Glue Side Leather to Goggles
The pieces are done and beautiful. First, glue the side pieces to the goggles. I used contact cement and alligator clips to hold it in place.

Step Nine: Measure out Band Needs, Create Buckle Holes And Stitch all Leather (Including Nose Guard)
When it comes to band ends, you need to make sure you take into account the measurements of the person wearing them. The measurements we are working with is about 21.5" and 22". I know I wanted 3/4" tall straps so I cut out a bunch of straps and started to cut out based on personal measurements. I attached the buckle end first to one side of the goggles.

Then to the opposite end. The adjustment holes were placed based on head measurements.

Then to the nose guard. I pricked holes in the sides and stitched it into the goggles using a curved needle. The straight needle would not have worked (I tried - It didn't work.)

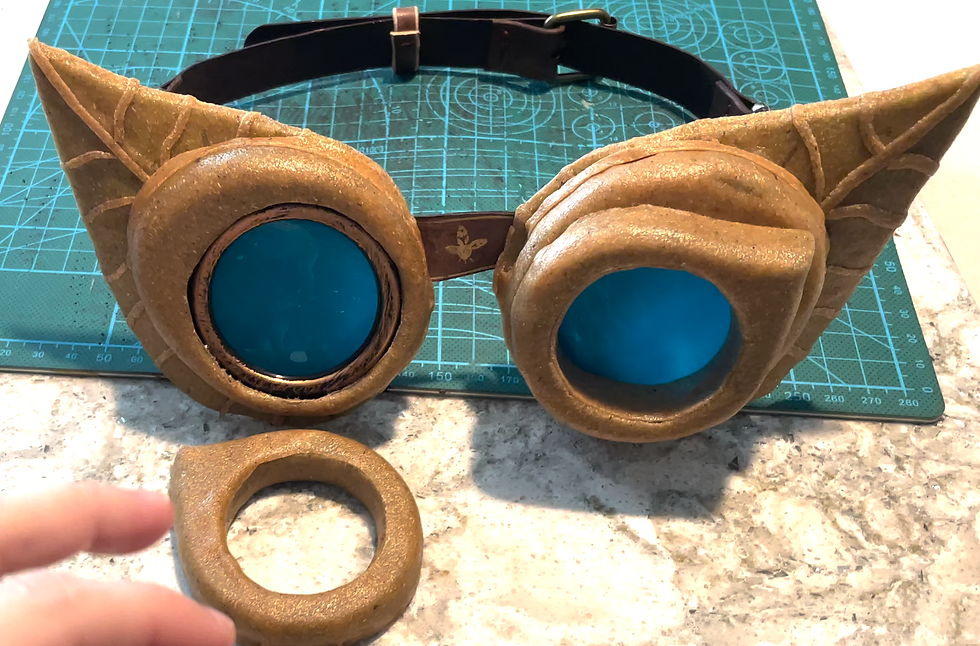
Step Ten: Cover Foam in Worbla
Once the leather is all attached and the lenses are complete, it is time to cover the foam in Worbla. The choice to cover it in Worbla or any thermoplastic is to ensure it will survive being handled and used. This process is done with a heat gun and a bunch of patience.

Step Eleven: Attach Worbla Pieces to Goggles
Now that we are at the end of the patience train, I used contact cement to attach the Worbla pieces to the rest of the Goggle. For the spaces that had gaps, I utilized the heat gun to heat the Worbla/foam to make them fit.
TIP 4: Attach all the pieces and then use your heat gun to provide 3D dimension and curve to all the pieces.
Step Twelve: Make Beak and Side Details - Then Attach
The beak was probably the easiest piece to make as it just took using a rough paper pattern and shaping. Since it was just made out of Worbla, it was heated and attached to the other Worbla around the nose area.

Now the side details are one piece of Worbla with strips of Worbla heated on top to create the pattern. It turned out to be super effective and easy process.

Step Thirteen Base Coat Worbla
To paint the worbla, you have to put a base coat on it. That coating is Carpenter Wood Glue and water (3:1 mixture). I used 3 layers on all of the Worbla which made the texture of the Worbla non-existent which was amazing.

Step Fourteen: Base Paint
For the base paint, I used several PlaidFX metallic paints. I have been trying them out in an effort to push my knowledge of metallic paints out there. I had to do several layers out 3-4 to get them to look truly metallic on the Worbla.

Step Fifteen: Weathering Worbla Pieces
An important last step is to give it some texture. It is my favorite step because everything goes from flat to beautiful. I used black and copper along with a paper towel to get texture. Paper Towel can give you different patterns that you cannot get organically with just a paint brush.

Step Sixteen: Glue Side Pieces on Leather and Add Painted White Triangles
Using Contact Cement, glue side embellishments to leather.

I eyeballed the arrows which I think turned out pretty well

And this is the final look:
DONE!
Optional Step : Make A Great Artificer Display for Goggles
This video will be coming soon to make a holder for your Goggles to show them off.
Thank you for reading this guide. Happy Making!
All photos are copyright of Nicole Bianco Designs, LLC and cannot be used by anyone else without written permission.
תגובות